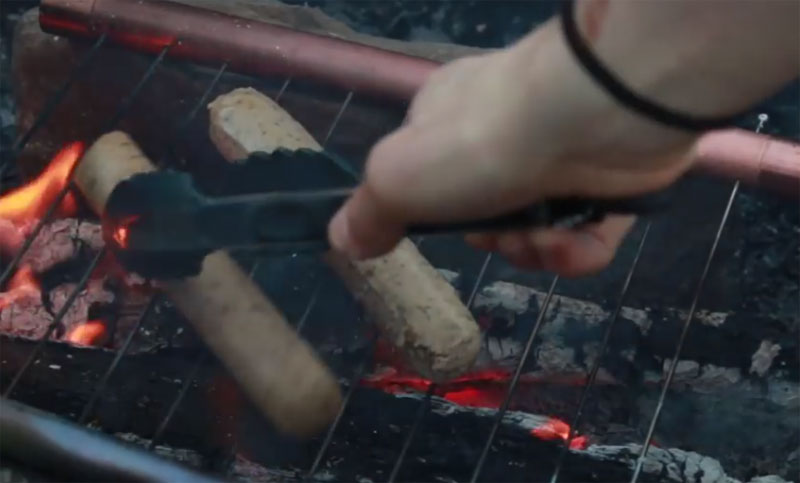
DIY Backpacking Grill
As a backpacker, it’s easy to realize that sometimes you need to think outside the box. The nice folks at Nifty Outdoors have come up with this brilliant idea for a DIY backpacking grill.
What you’ll need:
- Drill and Drill Bit – Buy on Amazon
- Ruler or Measuring Tape – Buy on Amazon
- Wire Cutters – Buy on Amazon
- 11 Bike Spokes with 2 Ends – Buy on Amazon
- Magic Marker (or something to make marks) – Buy on Amazon
- 12″ of 3/4″ Copper Pipe
- 12″ of 5/8″ Copper Pipe
- 2 3/4″ Copper Caps
Step 1: Mark off 1-inch marks on both Copper Pipes
You’ll be drilling into these later. Make sure that the marks are aligned horizonally.
Step 2: Drill Holes
Use a 3/32 drill bit in your drill to drill holes on each pipe. Do NOT drill through the other side. On the 3/4″ pipe, drill through the other side of the 2 outermost markings on each end.
Prep the bike spokes
Cut both ends off of 9 bike spokes, while leaving the screw end intact on the other 2. Using pliers or the wire cutter, bend a 90-degree angle on one of the cut ends of each spoke.
Assemble the grill
Place one bent end into each of the 11 holes of the 5/8″ pipe, saving the 2 spokes with only one cut end for the outermost holes. Attach the 3/4″ pipe to the other end of the spokes. The 2 spokes with uncut screw ends will go completely through the 3/4″ pipe on those outermost holes. Use the spoke screws to secure these 2 spokes in place, which holds the grill firmly in place when in use.
Fold up the grill
Remove the screws and spokes, and place them all inside the 5/8″ copper pipe. Place that inside the 3/4″ copper pipe. Use the 3/4″ copper caps to hold it all together.
And that’s it! You’ve got your very own DIY portable camping grill that’s lightweight and perfect for backpacking.
Don’t Feel Like Making Your Own? No Problem!
Check out the UCO Grilliput Portable Camping Grill on Amazon!